Why Ensuring the Consistency of Galvanized Steel Can Be a Challenge
Galvanized steel sheet has literally thousands of applications in modern manufacturing. Metal fabricators, regardless of the end market, recognize the value in terms of extended functional life that a thin layer of zinc can provide to steel sheet. Designers specify the exact zinc coating weight required for optimum corrosion resistance required in their application. The expected environment, required lifetime, radius of bend in the sheet all influence the ideal value of the target coating thickness.
In order to assure consistency across suppliers of zinc coated sheet, internationally agreed product definitions, or coating designations were established. The ASTM Standard A653 / A653M is one of a few international standards that list products and the coating weight that defines their designation1. To assist with verifying the coating weight during production, ASTM also provides standard A754 / A754 M which describes the standard tests for coating weight measurement using X-ray Fluorescence2. However, finding international standards that define coating weight reference material has been an ongoing challenge for galvanizers where quality/ISO regulations require traceability.
International Reference Standards
At the Bureau International des Poids et Mesures (BIPM) in Paris, France, one can find the original physical standards used to define length (meter) and mass (kilogram). Those standards, originally fabricated in 1799, have been retired and subsequent generations of the standards made of platinum-iridium served as the reference standard for international measurements for decades. The BIPM and other standards organizations have recently migrated to definitions of these basic units of measure that are based on physical constants, such as the speed of light in vacuum. But with all the advances made to precisely define those quantities, there are no international permanent reference standards for galvanized steel sheet.
ASTM Standard A90 / A90M provides a standardized test method for determining the coating weight of steel sheet coated with zinc and other metallic coatings, but there are three limitations with this approach.3
- The first is straightforward: the weigh-strip-weigh (W-S-W) test destroys the sample in the process of verifying the coating weight thereby limiting the sample’s effectiveness to just one point in time.
- The second is time itself, even the most efficient line to lab transfers and testing process may take 5 to 15 minutes before a result is collected and communicated back to operations. During that time, an entire coil may have been rolled under similar line conditions, resulting in downgraded material if the test indicates any below tolerance coating values.
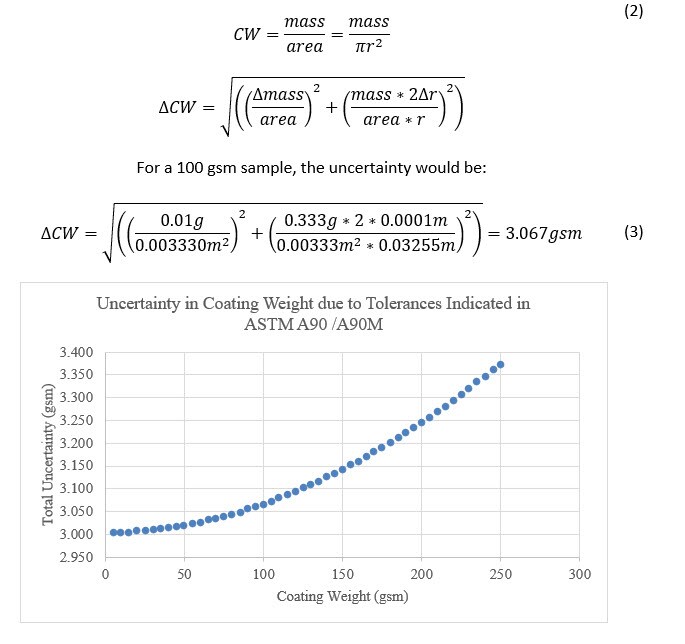
- The final limitation is subtle and revealed when analyzing the details of procedure (section 7) of the standard. Specifically, section 7.3 indicates that the weight (mass) of the specimens be determined to the nearest 0.01g and section 7.4, indicates that the area of the sheet be determined to the nearest 0.01in2 (5 mm2). This section also refers back to note 2 which indicates a sample size of 3330mm2 or 65.1mm+/- 0.1mm in diameter. When the mass tolerances is divided by the sample area the result produces an expected uncertainty of roughly 3 gsm. (see Equation 1-3 and Figure 1)

In an extreme worst case, the W-S-W process could have an error of +0.01g on the weight of the coated samples, and a -0.01g error on the weight of the stripped sample, this would result in an error on the order of 6 gsm in the final assigned value.
In an effort to produce permanent zinc coated samples traceable to basic metrology units, some have taken zinc foils of an area verified against certified length standards and then had the mass determined on a scale calibrated with certified mass standards. The foil would then be mounted with glue, or some other adhesive to a steel sheet. While the resulting sample has a ‘traceable’ mass per unit area, there are several assumptions that prevent it from being a practical galvanized steel reference standard. One cannot assure that the foil is the same thickness throughout the entire area, the purity of the zinc may be an issue, or most obviously, the act of gluing the foil to the steel base does not produce the same thin alloy layer generated in the hot dipped process. Each one of those factors limit the effectiveness of using zinc foils in calibrating on X-ray Fluorescence (XRF) based coating weight gauges.
For more detailed information, read the white paper Challenges Associated with Developing XRF Coating Weight Standards that includes a review of XRF coating weight gauges, calibration methods and charts, and notes about the ideal GI sample collection process.